
New computer! Now what?
 Setting up your new machine for some production crushing YoloITing
Update: March 2023 - added some more examples of non winget installation.
The Setting
Sooo, new pc, all cool and stuff, but no time to waste… there is YoloITing to be done! This post will walk through the steps i do to set up my machine so i can write som code and hopefully not burn down anything!
The Problem
- First off there is a bunch of installed apps I don’t want.
- Then there are some apps i want to install, together with PowerShell, PowerShell modules, cli etc. this usually takes a bit of time to do…
- There are many settings and adjustments to be made… all this takes time
- This is forever changing so the post will be kind of a forever-WIP.
The Goal
I’m running windows 11 with an out of the box installation. I wanted to to find the fastest way to get my pc up and running in a consistent way, with minimal effort. Also, so i don’t forget how it did this, next time round.
One way to do solve it
Before we begin, please remember to not be a Yoloer… check in with the folks that handle clients (if a work device) in advance to let them know you will be doing some stuff to your machine (that they may or may not like).
Respect your IT elders!
Some basics
I like larger icons on the taskbar, disable sleep for Bluetooth devices and usually use a few folders for various tools
# directory for tooling
New-Item -Path "c:\" -Name "tools" -ItemType "directory"

# tempfolder
New-Item -Path "c:\" -Name "temp" -ItemType "directory"

# larger taskbar icons
cmd /c "reg add HKEY_CURRENT_USER\Software\Microsoft\Windows\CurrentVersion\Explorer\Advanced /v Taskbarsi /t REG_DWORD /d 2 /f" # (at least this is the key to change :D )
# disable sleep mode for bluetooth
cmd /c "reg add HKEY_LOCAL_MACHINE\SYSTEM\CurrentControlSet\Control\Power /v CsEnabled /t REG_DWORD /d 0 /f"
Removing unused apps
Right lets get rid of some apps. Remove the apps you do not want by adding them to the list below and run them in PowerShell ISE (as administrator, since VS Code is not installed yet)
$appsToUninstall = get-appxprovisionedpackage -online | where { (`
         $_.displayname -like "Microsoft.BingNews" `
         -or $_.displayname -like "Microsoft.BingWeather" `
         -or $_.displayname -like "Microsoft.GamingApp" `
         -or $_.displayname -like "Microsoft.GetHelp" `
         -or $_.displayname -like "Microsoft.Getstarted" `
         -or $_.displayname -like "Microsoft.PowerAutomateDesktop" `
         -or $_.displayname -like "Microsoft.windowscommunicationsapps" `
         -or $_.displayname -like "Microsoft.MicrosoftSolitaireCollection" `
         -or $_.displayname -like "Microsoft.WindowsFeedbackHub" `
         -or $_.displayname -like "Microsoft.WindowsMaps" `
         -or $_.displayname -like "Microsoft.WindowsSoundRecorder" `
         -or $_.displayname -like "MicrosoftTeams" `
         -or $_.displayname -like "Microsoft.SkypeApp" `
         -or $_.displayname -like "Microsoft.XboxApp" `
         -or $_.displayname -like "Microsoft.Xbox.TCUI" `
         -or $_.displayname -like "Microsoft.XboxGameOverlay" `
         -or $_.displayname -like "Microsoft.XboxGamingOverlay" `
         -or $_.displayname -like "Microsoft.XboxIdentityProvider" `
         -or $_.displayname -like "Microsoft.XboxSpeechToTextOverlay" `
         -or $_.displayname -like "Microsoft.YourPhone" `
         -or $_.displayname -like "Microsoft.ZuneMusic" `
         -or $_.displayname -like "Microsoft.ZuneVideo"
   ) }

foreach ($app in $appsToUninstall ) { $null = Remove-AppxProvisionedPackage -Online -AllUsers -PackageName $app.PackageName -erroraction silentlyContinue }
Installing the apps you want
Next, adding some apps. Now here I have played around with 3 different options.
Option 1 - Using a script to download & install manually/silently/semi-silently
I’m trying to avoid this approach as this is more Yoloing and takes more time. However, some examples Example:
# Az CLI  - https://learn.microsoft.com/en-us/cli/azure/install-azure-cli-windows?tabs=azure-cli
# ------------------------------------------------------------------------------------------------- #
$ProgressPreference = 'SilentlyContinue'
Invoke-WebRequest -Uri https://aka.ms/installazurecliwindows -OutFile c:\temp\AzureCLI.msi
Start-Process msiexec.exe -Wait -ArgumentList '/I c:\temp\AzureCLI.msi /quiet' #; rm .\AzureCLI.msi

# Powershell Core - https://learn.microsoft.com/en-us/powershell/scripting/install/installing-powershell-on-windows?view=powershell-7.3#installing-the-msi-package
# ------------------------------------------------------------------------------------------------- #
# NOTE that you may need to update the correct PS version 7.2.2 will become old, fast...
Invoke-WebRequest -Uri https://github.com/PowerShell/PowerShell/releases/download/v7.2.2/PowerShell-7.2.2-win-x64.msi -OutFile c:\temp\PowerShell-7.2.2-win-x64.msi
msiexec.exe /package PowerShell-7.2.2-win-x64.msi /quiet ADD_EXPLORER_CONTEXT_MENU_OPENPOWERSHELL=1 ENABLE_PSREMOTING=1 REGISTER_MANIFEST=1 USE_MU=1 ENABLE_MU=1

# Azure powershell modules
# ------------------------------------------------------------------------------------------------- #
see below

# bicep
# ------------------------------------------------------------------------------------------------- #
## with CLI
az bicep install

# install Bicep with powershell OR CLI
$installPath = "$env:USERPROFILE\.bicep"
$installDir = New-Item -ItemType Directory -Path $installPath -Force
$installDir.Attributes += 'Hidden'
# Fetch the latest Bicep CLI binary
(New-Object Net.WebClient).DownloadFile("https://github.com/Azure/bicep/releases/latest/download/bicep-win-x64.exe", "$installPath\bicep.exe")
# Add bicep to your PATH
$currentPath = (Get-Item -path "HKCU:\Environment" ).GetValue('Path', '', 'DoNotExpandEnvironmentNames')
if (-not $currentPath.Contains("%USERPROFILE%\.bicep")) { setx PATH ($currentPath + ";%USERPROFILE%\.bicep") }
if (-not $env:path.Contains($installPath)) { $env:path += ";$installPath" }
# Verify you can now access the 'bicep' command.
bicep --help

# install GIT -
# this one i do not have a code snippit for. Script below is not tested
# ------------------------------------------------------------------------------------------------- #
# https://www.powershellgallery.com/packages/Install-Git/1.0/Content/Install-Git.ps1

https://git-scm.com/download/win

# GIT config
# ------------------------------------------------------------------------------------------------- #
see below

# vscode  - https://code.visualstudio.com/
# ------------------------------------------------------------------------------------------------- #
Invoke-WebRequest -Uri  https://code.visualstudio.com/sha/download?build=stable&os=win32-x64-user -outfile c:\temp\vscode.exe

# vs code settings
# ------------------------------------------------------------------------------------------------- #
see below

# vscode
Invoke-WebRequest -Uri  https://code.visualstudio.com/sha/download?build=stable&os=win32-x64-user -outfile c:\temp\vscode.exe
Option 2 - using winget runtime
For the client I’m on now, I installed the apps using winget
If winget is not installed on your machine (when writing this winget comes default with preview versions of w11)
# update VCLibs
Get-AppXPackage *VCLibs*
$vcLibs_Link = "https://aka.ms/Microsoft.VCLibs.x64.14.00.Desktop.appx"
$vcLibs_local_path = "c:\temp\$($vcLibs_Link.split('/')[-1])"
Invoke-WebRequest -Uri $vcLibs_Link -OutFile $vcLibs_local_path # (Join-Path $RepoPath -ChildPath $WinGet_Name )
Add-AppxPackage $vcLibs_local_path # -DisableDevelopmentMode

# add winget
$WinGet_Link = ((Invoke-RestMethod -uri 'https://api.github.com/repos/microsoft/winget-cli/releases/latest').assets | Where { $_.browser_download_url.EndsWith('msixbundle') } | Select -First 1).browser_download_url
$WinGet_Local_path = "c:\temp\$($WinGet_Link.split('/')[-1])"
Invoke-WebRequest -Uri $WinGet_Link -OutFile $WinGet_Local_path ; add-AppxPackage $WinGet_Local_path

# winget license
$WinGet_Lic_Link = ((Invoke-RestMethod -uri 'https://api.github.com/repos/microsoft/winget-cli/releases/latest').assets | Where { $_.browser_download_url.EndsWith('License1.xml') } | Select -First 1).browser_download_url
$lic_Local_Path = "c:\temp\$($WinGet_Lic_Link.split('/')[-1])"
Invoke-WebRequest -Uri $WinGet_Lic_Link -OutFile $lic_Local_Path ; Add-AppxProvisionedPackage -Online -PackagePath $WinGet_Local_path -LicensePath $lic_Local_Path
Once winget is available simply find the apps you want to install by first searching to them:
# winget install apps (yes this could be done using a foreach etc but YoloIT)
# some packages are not found if  --scope 'machine'

winget install                   --id "Microsoft.MouseandKeyboardCenter"   --source "winget"           --silent --verbose-logs
winget install                   --id "Spotify.Spotify" -                  --source "winget" --exact   --silent --verbose-logs # package not found if  --scope 'machine' (and must not be admin)
winget install                   --id "Microsoft.AzureCLI"                 --source "winget" --exact   --silent --verbose-logs # package not found if  --scope 'machine'
winget install                   --id "Microsoft.Bicep"                    --source "winget" --exact   --silent --verbose-logs
winget install                   --id "Microsoft.VisualStudioCode"         --source "winget" --exact   --silent --verbose-logs
winget install --scope 'machine' --id "LogMeIn.LastPass"                   --source "winget" --exact   --silent --verbose-logs
winget install --scope 'machine' --id "Microsoft.PowerShell"               --source "winget" --exact   --silent --verbose-logs
winget install --scope 'machine' --id "Git.Git"                            --source "winget" --exact   --silent --verbose-logs
winget install --scope 'machine' --id "GitHub.cli"                         --source "winget" --exact   --silent --verbose-logs
winget install --scope 'machine' --id "Notepad++.Notepad++"                --source "winget" --exact   --silent --verbose-logs

#winget install --scope 'machine' --id "PuTTY.PuTTY"                          --source "winget" --exact --silent --verbose-logs
#winget install --scope 'machine' --id "SlackTechnologies.Slack"              --source "winget" --exact --silent --verbose-logs
#winget install --scope 'machine' --id "Microsoft.AzureStorageExplorer"       --source "winget" --exact --silent --verbose-logs
#winget install --scope 'machine' --id "WiresharkFoundation.Wireshark"        --source "winget" --exact --silent --verbose-logs
#winget install --scope 'machine' --id "DominikReichl.KeePass"                --source "winget" --exact --silent --verbose-logs
#winget install --scope 'machine' --id "Microsoft.SQLServerManagementStudio"  --source "winget" --exact --silent --verbose-logs
#winget install --scope 'machine' --id "Microsoft.WindowsAdminCenter"         --source "winget" --exact --silent --verbose-logs
#winget install                   --id "Microsoft.WindowsTerminal"            --source "winget" --exact --silent --verbose-logs
-
To find information about the various apps you install by going to: winget manifests
-
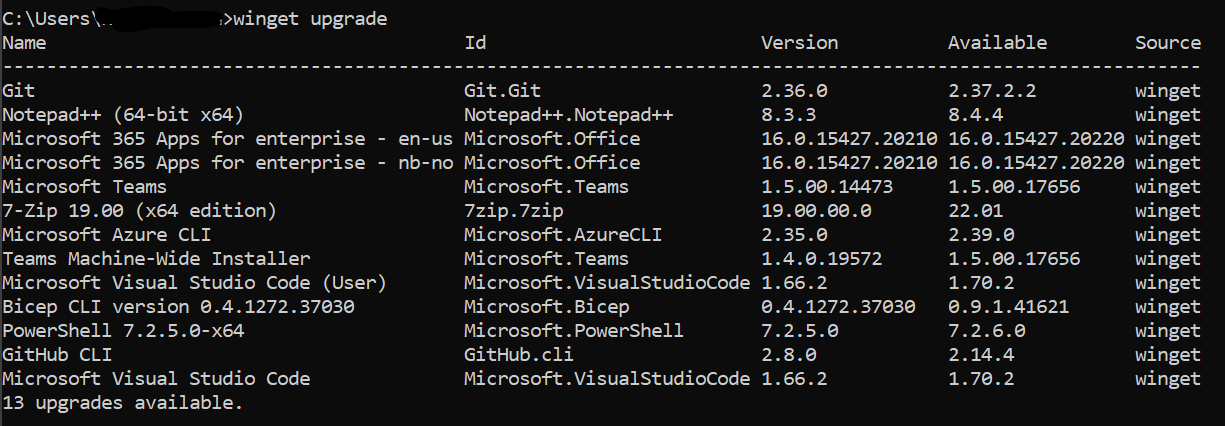
To update all the installed apps:
# list all the installed apps to check what updates are available
winget upgrade
# update all installed apps
winget upgrade --all
Option 2 - Using choco
This works just fine, I have used this before. installation guide using powershell Install choco by running:
Set-ExecutionPolicy Bypass -Scope Process -Force; [System.Net.ServicePointManager]::SecurityProtocol = [System.Net.ServicePointManager]::SecurityProtocol -bor 3072; iex ((New-Object System.Net.WebClient).DownloadString('https://community.chocolatey.org/install.ps1'))

    choco search firefox
    choco install firefox
    choco upgrade firefox
    choco upgrade all
you get the idea… Be careful with packages and sources.
Post installation steps
After everything is installed i like to make some changes to apps.
VS Code extensions and settings
VS Code settings and extensions - done manully:
code --list-extensions

code --install-extension GitHub.vscode-pull-request-github --force
code --install-extension msazurermtools.azurerm-vscode-tools --force
code --install-extension ms-azuretools.vscode-bicep --force
code --install-extension ms-vscode.azure-account --force
code --install-extension ms-vscode.azurecli --force
code --install-extension ms-vscode.powershell --force
code --install-extension docsmsft.docs-markdown --force
code --install-extension janisdd.vscode-edit-csv --force
code --install-extension eamodio.gitlens --force #
# code --install-extension redhat.vscode-commons --force
# code --install-extension redhat.vscode-yaml --force
# code --install-extension hashicorp.terraform --force
# code --install-extension ms-azuretools.vscode-azureterraform --force
# code --install-extension ms-azure-devops.azure-pipelines --force
# code --install-extension johnpapa.winteriscoming --force
Update your settings by either copy/paste in the app or
Copy-Item "C:\tools\settings.json" -Destination "C:\Users\{yourUseName}\AppData\Roaming\Code\User\settings.json"
Now for this there are a few other probably better options like using: Sync settings & extensions. I’m Currently using sync of settings.
Update git settings
Open git bash rick-click paste
git config --list
git config --global user.name "Yolo.IT"
git config --global user.email "xxxxxxxxxxxxxxxxxxxxxxxxxxxxxx@users.noreply.github.com"
git config --global core.editor "code --wait"
git config --global core.autocrlf input
git config --global init.defaultBranch main
git config --global credential.helper manager-coregit
Note that if you do not want to include your own email account, navigate to (and if you are using github) to find your XXXX email address to include in your git config. Find Your Github email
Installing PowerShell modules
For now no smartness just plain module installation
# start --> powershell core "pwsh"

# Azure powershell module
Install-Module -Name Az -Repository PSGallery -Force

# Azure AD module
Install-Module -Name AzureAD -Repository PSGallery -Force
Install-Module -Name AzureADPreview -Repository PSGallery -Force

# Resource Graph module
Install-Module -Name Az.ResourceGraph
Adding fonts for use in VS Code
I like to use the Fira Code font. manual task post configuration of the Git (manual cut/paste): MS font installation reference: MS Font Installation Guide
- Find Fonts: Nerd Fonts in my case Fira Code
- Download the fonts, copy them to the windows Fonts folder.
Invoke-WebRequest -Uri "https://github.com/ryanoasis/nerd-fonts/releases/download/v2.1.0/FiraCode.zip" -OutFile "c:\tools\FiraCode.zip"
Expand-Archive -Path "c:\tools\FiraCode.zip" -DestinationPath "C:\tools\FiraCode"
Xcopy "c:\tools\FiraCode" "C:\Windows\Fonts"
- alternately copy paste the fonts into the Fonts folder
Oh My Posh
Now this may not be your thing, I have not used to set this up myself really. However, if this is your bag MS guide for oh-my-posh:
winget install oh-my-posh --source msstore # unless you include it in the list above
to display icons when using oh my posh i have always needed to install this module
Install-Module -Name Terminal-Icons -Repository PSGallery
Add to your PowerShell profile
#from the vscode terminal:
notepad $PROFILE

# add the line
Import-Module -Name Terminal-Icons # loads the iconds
oh-my-posh init pwsh --config "$env:POSH_THEMES_PATH\agnoster.omp.json" | Invoke-Expression # replace the {themeName}.omp.json
now restart VS Code and you should have a new theme loaded with the icons. Themese can be found: Themes
The Future
My ultimate goal is to have all these steps as 1 script that I start and let run.
The End
The total time it took me to set up my new computer (after w11 base setup) was about 30ish minutes There will probably be some additional settings that need to be done as well as maybe a few minutes to download terraform or something like that but it does not take more then a coffee to make my computer ready to Yolo in production…
I will continue to update the script with new things as I find them.
Questions, comments and so on, send it: i.crashed.my.laptop@yoloit.no
Go forth and Yolo!